Oracle Kubernetes Engine에 WebLogic 올리기 - Nginx 추가
이 예제에서는 이전에 생성한 WebLogic Domain 앞 단에 Frontend 역할을 수행하는 Nginx를 추가해 볼 것이다.
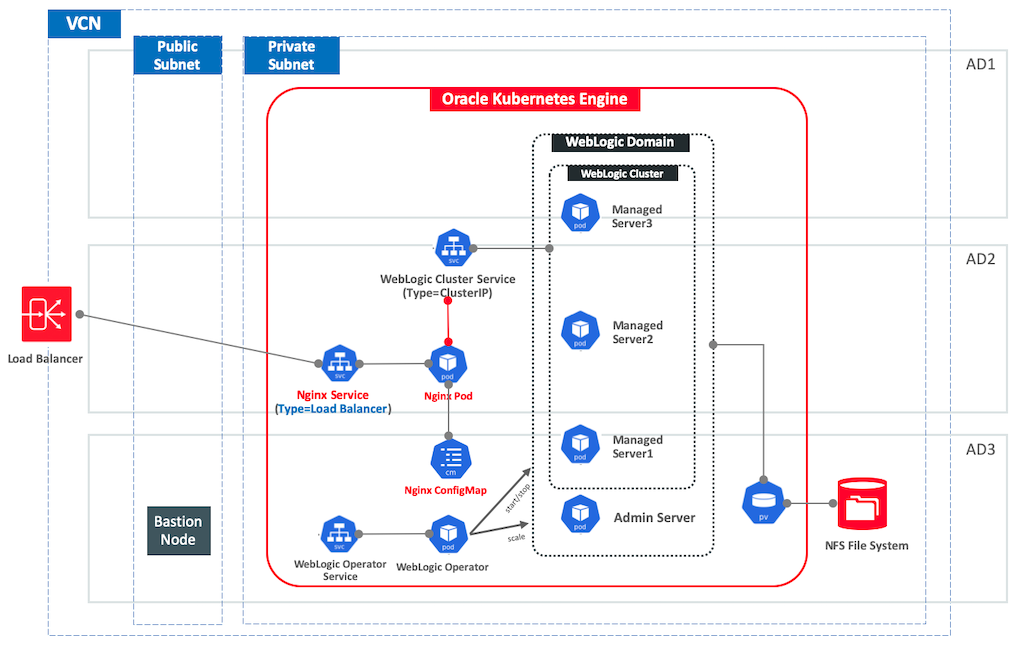
Architecture
Prerequistes
- Oracle Kubernetes Engine(OKE)
- Oracle File System
- Nginx
Nginx Deployment 구성하기
이전의 WebLogic Domain 환경이 그대로 남아있는 상황에서 Nginx 구성만 추가해 볼 것이다. Nginx를 통해 WebLogic Cluster로 요청이 넘어갈 수 있도록 WebLogic Server와 연결하는 구성이 필요하다. Nginx와 WebLogic Server 간의 연결 방법에 대해서는 Nginx 문서에 잘 설명되어 있다.
weblogic-basic.conf
WebLogic Server 연결을 위해 weblogic-basic.conf 파일이 필요하다. 파일 내용은 아래를 참고한다.
proxy_cache_path /tmp/NGINX_wl_cache/ keys_zone=backcache:10m;

map $http_upgrade $connection_upgrade {
    default upgrade;
    ''      close;
}

upstream weblogic {
    #ip_hash;
    hash $remote_addr;

    # WebLogic Cluster Kubernetes Service Name:Port
    server domain1-cluster-cluster-1:8001;
}

server {
    listen 80;
    server_name  _;

    location / {
        proxy_cache backcache;
        proxy_pass http://weblogic;

    }
}
nginx.conf
nginx.conf 내용은 다음과 같다.
user  nginx;
worker_processes  1;

error_log  /var/log/nginx/error.log warn;
pid        /var/run/nginx.pid;

events {
    worker_connections  1024;
}

http {
    include conf.d/weblogic-basic.conf;
    include       /etc/nginx/mime.types;
    default_type  application/octet-stream;

    log_format  main  '$remote_addr - $remote_user [$time_local] "$request" '
                      '$status $body_bytes_sent "$http_referer" '
                      '"$http_user_agent" "$http_x_forwarded_for"';

    access_log  /var/log/nginx/access.log  main;

    sendfile        on;
    #tcp_nopush     on;
    keepalive_timeout  65;
    #gzip  on;
}
ConfigMap YAML
Nginx 배포를 위해서 Deployment 구성 파일을 작성할 것이다. Nginx 이미지는 Docker Hub에서 가져와서 사용할 것이다. 이 Base 이미지의 기본 구성 파일이 아닌 내가 작성한 Custom Configuration을 사용하도록 하기 위햐여 Kubernetes의 ConfigMap 기능을 이용할 것이다.
커스텀 nginx.conf와 weblogic-basic.conf를 ConfigMap으로 만들기 위한 구성 내용이다.
apiVersion: v1
kind: ConfigMap
metadata:
  name: nginx-cm
data:
  nginx.conf: |
    user  nginx;
    worker_processes  1;

    error_log  /var/log/nginx/error.log warn;
    pid        /var/run/nginx.pid;

    events {
        worker_connections  1024;
    }

    http {
        include conf.d/weblogic-basic.conf;
        include       /etc/nginx/mime.types;
        default_type  application/octet-stream;

        log_format  main  '$remote_addr - $remote_user [$time_local] "$request" '
                          '$status $body_bytes_sent "$http_referer" '
                          '"$http_user_agent" "$http_x_forwarded_for"';

        access_log  /var/log/nginx/access.log  main;

        sendfile        on;
        #tcp_nopush     on;
        keepalive_timeout  65;
        #gzip  on;
    }
  weblogic-basic.conf: |
    proxy_cache_path /tmp/NGINX_wl_cache/ keys_zone=backcache:10m;

    map $http_upgrade $connection_upgrade {
        default upgrade;
        ''      close;
    }

    upstream weblogic {
        hash $remote_addr;

        # WebLogic Cluster Kubernetes Service Name:Port
        server domain1-cluster-cluster-1:8001;
    }

    server {
        listen 80;
        server_name  _;

        location / {
            proxy_cache backcache;
            proxy_pass http://weblogic;

        }
    }
Deployment YAML
Nginx를 배포하기 위한 구성 파일이다. Container에서 위에서 구성한 ConfigMap을 Volume으로 Mount하여 Custom Configuration을 참조하게된다
apiVersion: apps/v1
kind: Deployment
metadata:
  name: nginx-dp
spec:
  replicas: 1
  selector:
    matchLabels:
      app: nginx
  template:
    metadata:
      labels:
        app: nginx
    spec:
      containers:
      - name: nginx
        image: nginx
        ports:
        - containerPort: 80
        volumeMounts:
        - mountPath: /etc/nginx/nginx.conf # mount nginx.conf volume
          readOnly: true
          name: nginx-conf
          subPath: nginx.conf
        volumeMounts:
        - mountPath: /etc/nginx/conf.d # mount conf.d where weblogic-basic.conf is located
          readOnly: true
          name: nginx-confd
      volumes:
      - name: nginx-conf
        configMap:
          name: nginx-cm # refer to ConfigMap for `nginx-conf`
          items:
            - key: nginx.conf
              path: nginx.conf
      volumes:
      - name: nginx-confd
        configMap:
          name: nginx-cm # refer to ConfigMap for `nginx-confd`
          items:
            - key: weblogic-basic.conf
              path: weblogic-basic.conf
Service YAML
Load Balancer를 통해 외부에서 접속하기 위한 서비스를 추가한다.
이전 환경에서 포트 80을 사용하고 있는 서비스 (domain1-cluster1-lb-ext)는 미리 삭제해 둔다.
apiVersion: v1
kind: Service
metadata:
  name: ngnix-lb-ext
  namespace: default
  labels:
    app: nginx
  annotations:
    service.beta.kubernetes.io/oci-load-balancer-shape: "100Mbps"
    service.beta.kubernetes.io/oci-load-balancer-backend-protocol: "HTTP"
spec:
  type: LoadBalancer
  ports:
  - name: http
    port: 80
    targetPort: 80
  selector:
    app: nginx
배포하기
위에서 설명한 ConfigMap, Deployment, Service를 하나의 파일로 구성하여 한번에 적용할 것이다. nginx-dp-cm.yaml 파일을 생성하여 위 3개의 구성 내용을 넣어준다. 파일이 완료되었으면 kubectl를 통해 적용한다.
> kubectl apply -f nginx-dp-cm.yaml
배포가 완료되면 다음과 같이 보일 것이다.
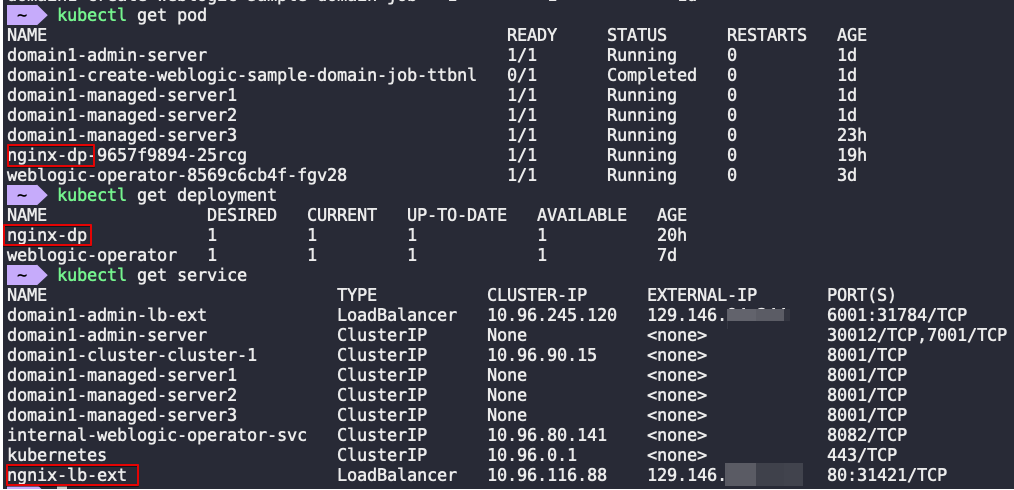
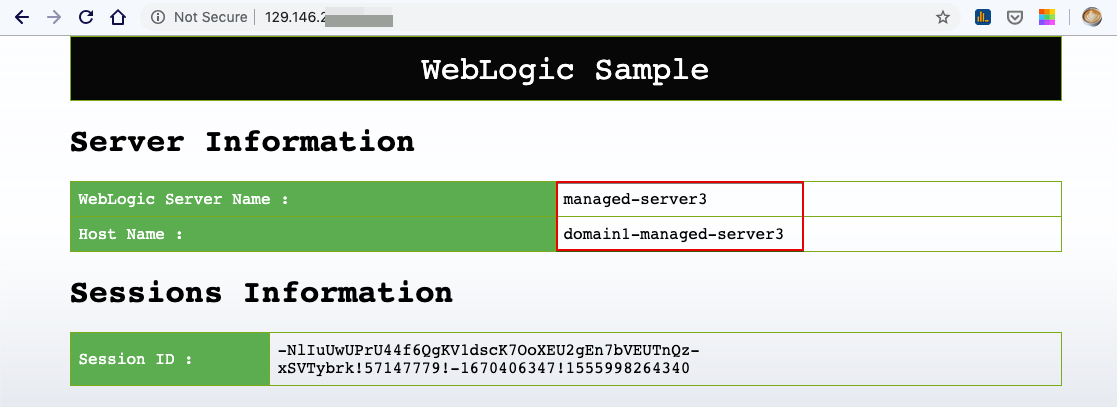
Nginx Service의 External IP를 통해 서비스에 접근해 보자. WebLogic Cluster로 요청이 정상적으로 Forward 되어 서비스 되는 것을 볼 수 있을 것이다.
Persistent Session
위 구성으로 테스트해 보면 매 요청 마다 다른 Managed Server가 호출되는 것을 볼 수 있을 것이다. WebLogic Cluster 간에 세션이 공유되기 때문에, 어느 Managed Server로 접속되더라도 세션이 유지되긴 하지만 동일 세션일 경우 같은 Managed Server로 요청이 갈수 있도록 하는 Sticky Session 구성은 Nginx Plus에서 가능하므로 여기에서는 IP Hash를 통해 같은 Backend Server로 요청이 되어질 수 있도록 하는 구성으로 바꿔보려고 한다.
이를 위해서는 Backend Server들이 upstream에 리스트 되어야 하기 때문에 cluster service를 사용하지 않고 Managed Server 각각을 list 해줘야 한다. 변경된 weblogic-basic.conf는 다음과 같다.
weblogic-basic.conf
proxy_cache_path /tmp/NGINX_wl_cache/ keys_zone=backcache:10m;

map $http_upgrade $connection_upgrade {
    default upgrade;
    ''      close;
}

upstream weblogic {
    #ip_hash;
    hash $remote_addr;

    # WebLogic Managed Server Kubernetes Service Name:Port
    server domain1-managed-server1:8001;
    server domain1-managed-server2:8001;
    server domain1-managed-server3:8001;

}

server {
    listen 80;
    server_name  _;

    location / {
        proxy_cache backcache;
        proxy_pass http://weblogic;

    }
}
변경 사항을 다시 반영한다.
> kubectl apply -f nginx-dp-cm.yaml
CofigMap만 변경되었다.

Nginx Container Restart를 위해서 다음 작업을 수행한다.
> kubectl scale deployment nginx-dp --replicas=0

다시 Container를 구동한다.
> kubectl scale deployment nginx-dp --replicas=1

이제 다시 애플리케이션을 브라우저에서 테스트 해보면 요청 시마다 다른 Managed Server로 접속되지 않고 한 Managed Server로 고정되는 것을 볼 수 있을 것이다.