Digital Assistant(챗봇)과 Autonomous Data Warehouse(ADW) 연계하기
오라클 챗봇인 Digital Assistant에서는 커스텀 비즈니스 코드를 작성을 지원하기 위해 Custom Component라는 기능을 제공하고 있습니다.
Custom Component는 오라클 모바일 클라우드에서 서비스되도록 작성되거나 Stand Alone으로 동작되도록 작성될 수도 있고, Oracle Digital Assistant가 제공하는 Custom Component를 위한 임베디드 컨테이너에서 구동되도록 작성될 수도 있습니다.
이 문서에서는 Oracle Autonomous Data Warehouse와 연계하는 방법을 Stand Alone Custom Component를 구현을 통해서 설명할 예정입니다.
아키텍쳐
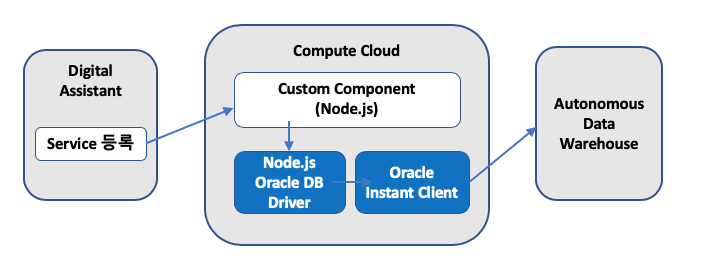
연계 아키텍쳐는 다음과 같습니다. Stand Alone Custom Component의 구동 환경은 Oracle Compute Cloud를 사용하였습니다.
사전 준비 사항
아래 서비스가 미리 생성되어 있어야 합니다.
- Oracle Digital Assistant (ODA)
- Oracle Autonomous Data Warehouse (ADW)
- Oracle Compute Cloud
Oracle Compute Cloud에 필요한 Software 설치하기
Compute Cloud를 Digital Assistant의 Custom Component 구동용으로 사용할 것이기 때문에 Custom Component SDK와 Oracle Database 연결을 위한 소프트웨어를 설치해야 합니다. 필요 소프트웨어는 다음과 같습니다.
- Node.js
- Oracle Instant Client
- GIT Client 설치
Compute Cloud 생성 및 SSH로 접속하기
Compute Cloud 생성은 다음을 참고합니다.
생성된 Compute 인스턴스에 Security Rule을 추가합니다. 여기서 추가하는 포트 3000은 향후 component 서버에서 사용할 포트입니다. Security List 설정의 자세한 방법은 아래를 참고 하세요.
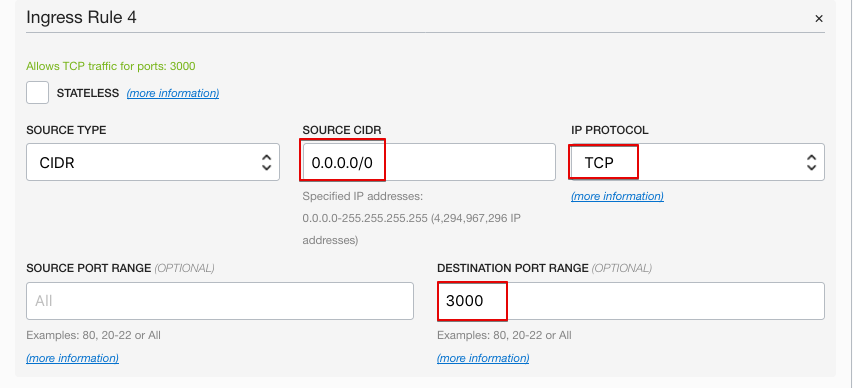
OS 자체의 firewall 서비스를 사용할 경우 해당 포트를 firewall에서도 open 시켜줘야 합니다.
생성된 Compute의 Public IP를 확인하고 SSH로 접속합니다.
Node.js 설치하기
Compute Cloud에 Node.js를 설치합니다.
> sudo yum -y install nodejs
Node.js 설치 방법 및 바이너리 다운로드는 다음을 참고합니다.
Oracle Instant Client 설치하기
위 다운로드 사이트에서 아래 파일을 다운 받습니다.

Compute Cloud로 upload 합니다. (SCP나 SFTP 이용)
> scp -i privatekey instantclient-basic-linux.x64-18.3.0.0.0dbru.zip opc@{Compute Public IP}:/home/opc/.

업로드된 instant client 파일의 압축을 풉니다.
unzip instantclient-basic-linux.x64-18.3.0.0.0dbru.zip
.bash_profile에 다음을 추가해 줍니다.
export LD_LIBRARY_PATH=/home/opc/instantclient_18_3:$LD_LIBRARY_PATH
export TNS_ADMIN=/home/opc/instantclient_18_3/network/admin
Instant Client에서 ADW 연결을 위해서는 ADW Client Wallet을 다운 받아야 합니다. ADW 콘솔에 접속하여 Client Wallet을 다운 받습니다.
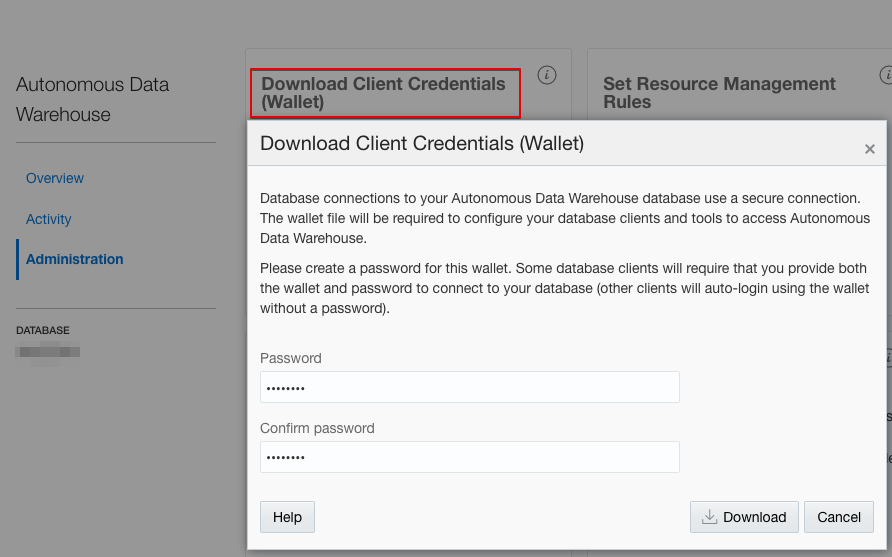
다운 받은 Wallet의 내용은 다음과 같습니다.
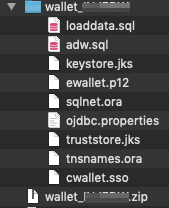
Wallet을 Compute Cloud의 Instant Client 설치 디렉토리로 복사하여 압축을 풀어 줍니다.
> scp -i privatekey wallet.zip opc@{Compute Public IP}:/home/opc/instantclient_18_3/network/admin/.
복사한 Wallet의 압축을 풀고 난 후의 admin 디렉토리 내용은 다음과 같습니다.

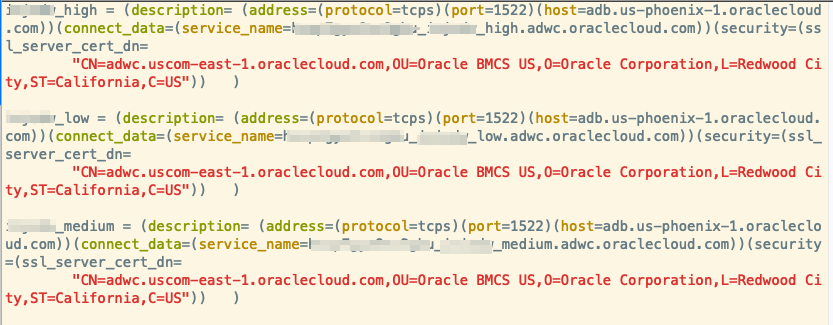
tnsnames.ora 파일을 열어서 접속할 서비스명을 확인합니다. {DB명}_high, {DB명}_medium, {DB명}_low 중에서 선택하여 사용하면 됩니다.
Custom Component 작성하기
ADW에 연결하기 위한 Custom Component 작성을 위한 준비가 완료 되었습니다. 소스를 Git에서 다운 받기 위해 Git Client가 필요합니다. 다음을 실행하여 git을 설치합니다.
> sudo yum install git
이제 Sample로 작성된 ADW 연결용 Custom Component를 다운 받습니다.
> git clone https://github.com/mee-nam-lee/chatbot.git
> cd chatbot_adw/bot-start
> npm install
샘플 소스 코드에서 ADW 연결을 위한 정보를 수정해 줍니다. chatbot_adw/bot-start/components/dbconfig.js 파일을 열어서 user, password, connectString 부분을 수정합니다. tns_name은 tnsnames.ora에서 참고하면 됩니다.
module.exports = {
    user          : process.env.NODE_ORACLEDB_USER || "your_username",
    password      : process.env.NODE_ORACLEDB_PASSWORD || "your_userpassword",
    connectString : process.env.NODE_ORACLEDB_CONNECTIONSTRING || "your_tns_name",

 ... 생략

};
소스 코드 잠깐 살펴 보기
실제 SQL을 수행하여 Database에서 정보를 조회하는 부분은 chatbot_adw/bot-start/components/oracledb.js에 들어있습니다. getADW 함수내의 SQL 문장을 원하는 SQL로 변경하여 수행하면 됩니다.
async function getADW() {
  return new Promise(async function(resolve, reject) {

...생략

// ADW Sample Sales History 조회 SQL
      let sqlstring = 'SELECT channel_desc, TO_CHAR(SUM(amount_sold),\'9,999,999,999\') SALES$, \
                              RANK() OVER (ORDER BY SUM(amount_sold)) AS default_rank, \
                              RANK() OVER (ORDER BY SUM(amount_sold) DESC NULLS LAST) AS custom_rank \
                       FROM sh.sales, sh.products, sh.customers, sh.times, sh.channels, sh.countries \
                       WHERE sales.prod_id=products.prod_id AND sales.cust_id=customers.cust_id \
                           AND customers.country_id = countries.country_id AND sales.time_id=times.time_id \
                           AND sales.channel_id=channels.channel_id \
                           AND times.calendar_month_desc IN (\'2000-09\', \'2000-10\') \
                           AND country_iso_code=\'US\' \
                       GROUP BY channel_desc';

... 생략

}
조회된 데이터를 챗봇에 보내줄때는 conversation.reply()라는 chatbot SDK의 함수를 사용합니다. 해당 예제에서는 Text 형태로만 리턴하였기 때문에 conversation.reply에 text 만 사용하였으나. 채널 유형에 따라 다양한 형태의 json 메시지를 보낼 수 있습니다. 관련된 상세 정보는 Oracle Bot SDK를 참조하면 됩니다.
    getADW()
      .then(function(result){
        for (var i=0 ; i < result.length ; i++) {
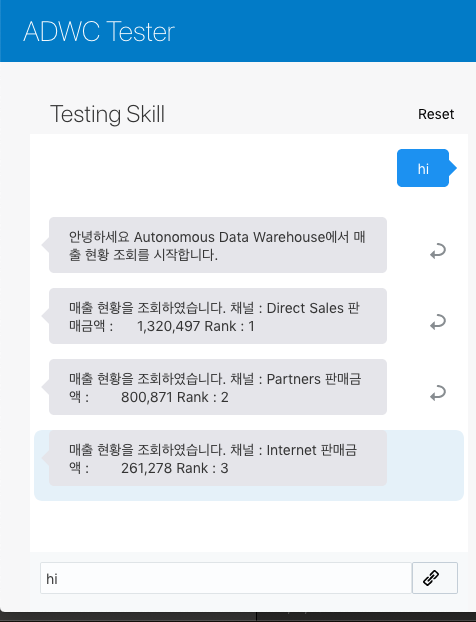
            conversation.reply(`매출 현황을 조회하였습니다. 채널 : ${result[i][0]} 판매금액 : ${result[i][1]} Rank : ${result[i][3]}`);
        }
커스텀 컴포넌트 구동
다음 명령어를 수행하여 컴포넌트를 구동해 봅니다.
> node index.js
3000번 포트를 사용하여 서비스가 구동되었습니다.
백그라운드로 구동하려면 다음과 깉이 실행합니다. nohup node index.js > nohup.out 2>&1 &

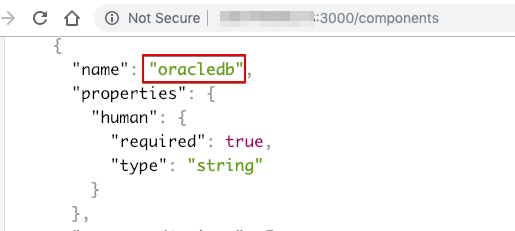
브라우저를 통해서 해당 컴포넌트가 잘 구동되었는지 확인합니다.
Digital Assistant (Chatbot)에서 Custom Component 연결하기
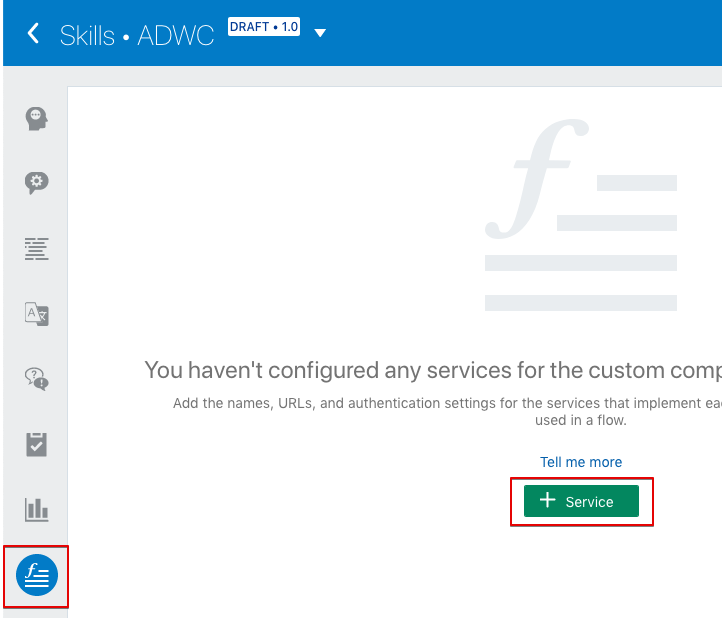
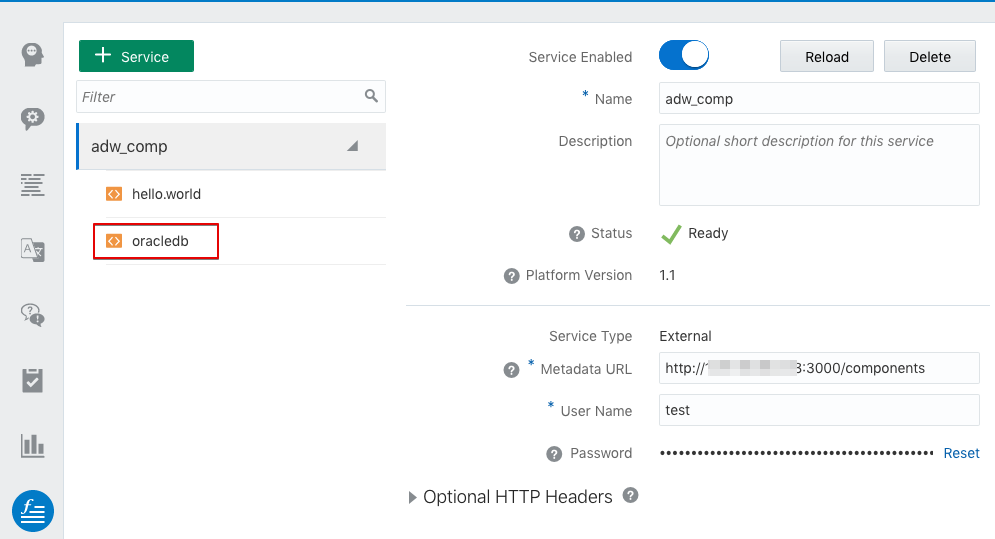
작성된 Custom Component를 챗봇에서 사용하기 위해서는 컴포넌트를 사용할 Bot에 Service로 연결해 주어야 합니다. Bot 화면으로 이동하여 다음과 같이 서비스 등록 화면에서 서비스 추가 버튼을 클릭합니다.
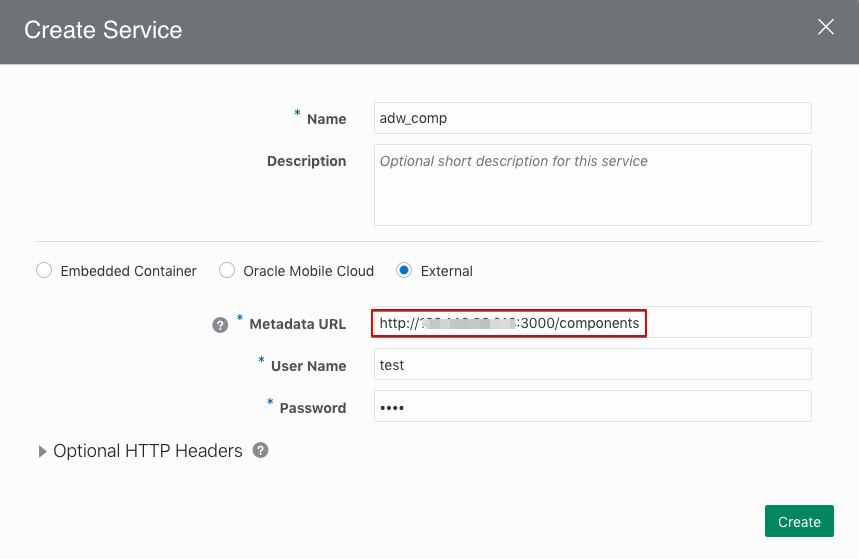
이름과 Metadata URL(위 브라우저에서 테스트 했던 URL)을 입력하고 Username과 Password를 입력합니다.(이 샘플 컴포넌트 등록을 위해서는 test로 입력)
서비스가 잘 등록된 것을 확인할 수 있습니다. oracledb 라는 컴포넌트를 Bot Flow에서 호출하여 사용할 것입니다.
Bot Flow에서 사용하기
Bot Flow에서 등록한 Custom Component는 다음과 같이 호출합니다.
 printcountry:
    component: "oracledb"
    properties:
      human: "meenam"
    transitions:
      return: "done"
테스트
연결이 잘 되고 호출이 정상적으로 이루어지는지 Test UI를 통해 테스트를 싱행합니다. 정상적으로 수행되면 다음과 같이 ADW에서 Sales History를 조회해 올 것입니다.
모두 완료되었습니다.
참고 자료
Oracle 챗봇 컴포넌트 작성을 위한 자세한 SDK 가이드는 다음을 참고하세요
Node.js용 Oracle DB Driver 상세와 샘플코드는 아래를 참고하세요.